In this article I’ll introduce you to task management tool gulp, you’ll learn how to install plugins for it and creating tasks. Gulp makes front-end development simple and pleasant.
What is gulp
Here’s description of gulp taken from its website — gulp is a toolkit for automating painful or time-consuming tasks in your development workflow, so you can stop messing around and build something.
The Main part of the development with gulp is creating tasks. Tasks process data through pipes.
Imagine task as a conveyor belt and pipes as conveyor belt’s workers.
Prerequisites
Gulp is built on Node.js and npm. Because of that, all you need is to install Node.js (npm installs along with it).
Installing gulp
Installation of gulp is pretty simple and is done using npm — the Node.js package manager.
First, you need install gulp-cli package globally:
npm install gulp-cli -gnpm install gulp -DNow by executing gulp command in your project folder gulp-cli will use locally the installed version of gulp.
Gulpfile.js
By executing gulp command, it will look for a file named gulpfile.js and will launch default task described in it.
You can specify which task you want to launch by adding its name as an argument to the gulp command like that:
gulp tasknameProject sctructure
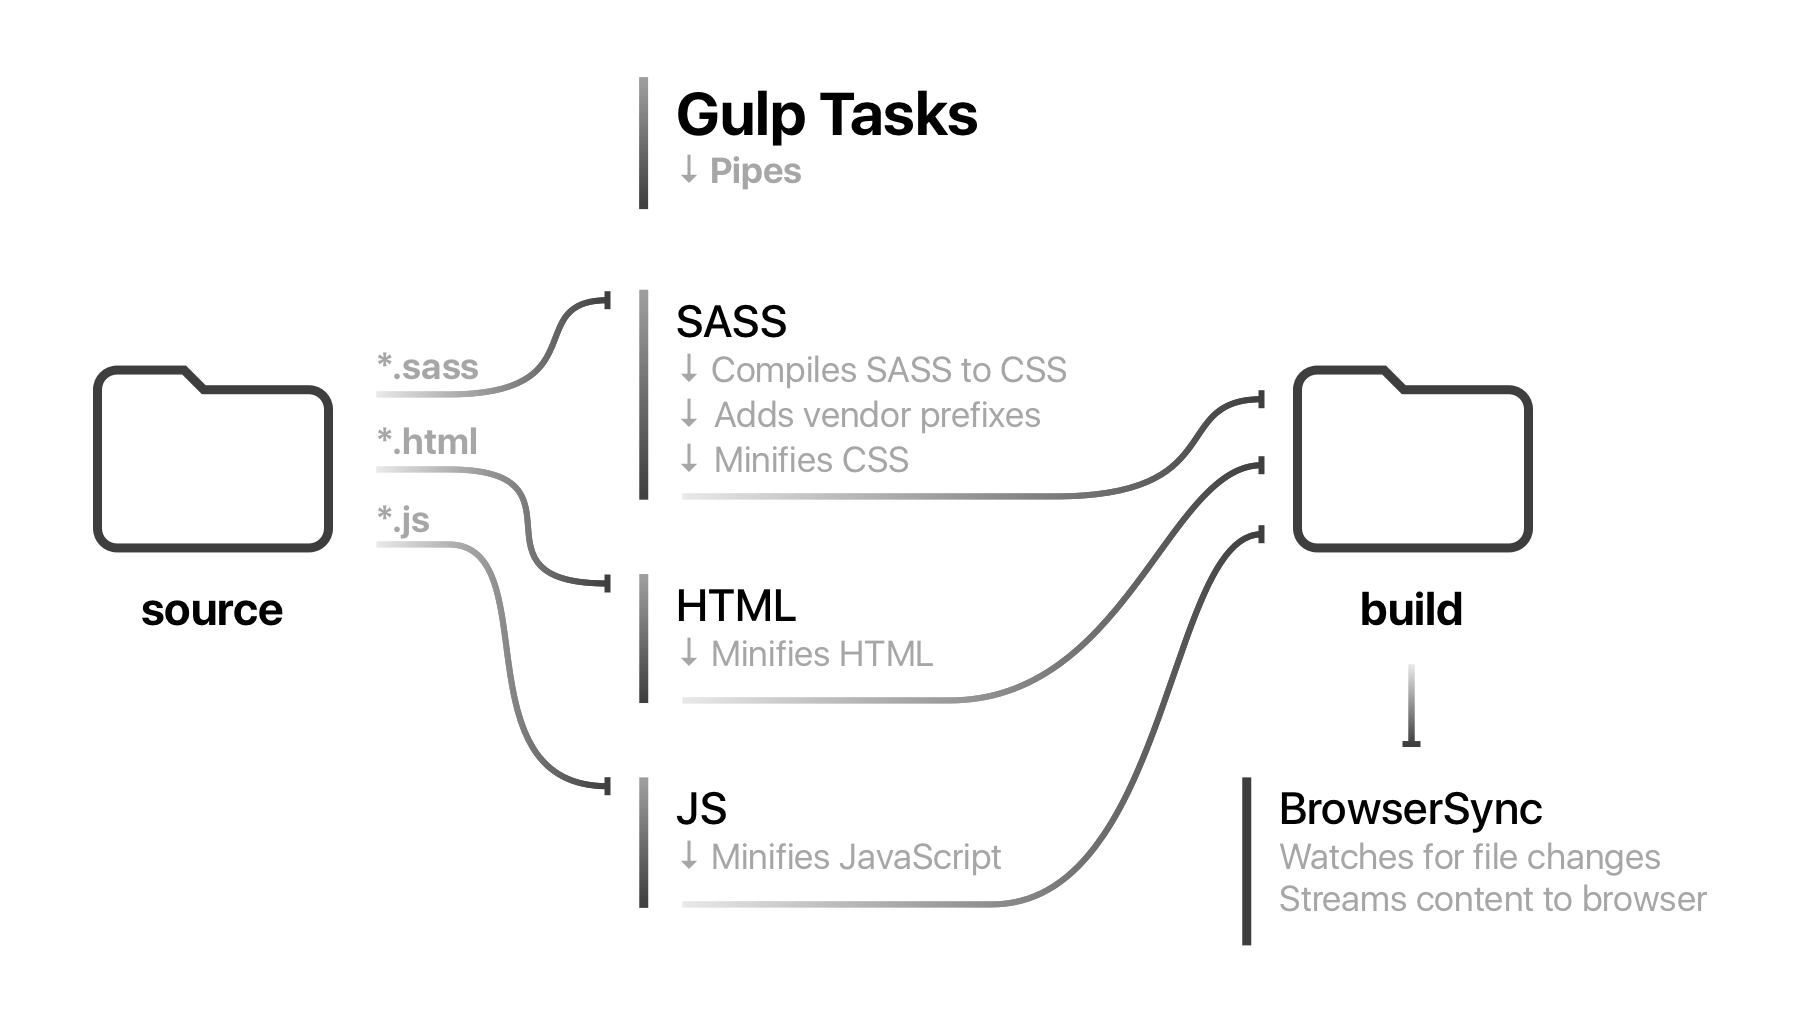
Let’s create two folders in our project called source and build. In source folder, we will put source code of out front-end project, which will be processed by our gulp tasks, and the result will be put in the build folder.
So it should look like this:
- source
- build
- gulpfile.js
Writing a task
Let’s start by writing our first task that will simply copy files from source to build folder untouched and let’s call it copy.
var gulp = require('gulp'); // Requiring locally installed gulp package

var source = 'source/', destination = 'build/'; // Definition of source and build folder names

gulp.task('copy', function() { // Definition of task with name 'copy'
	return gulp.src(source + '*') // Take all(*) files from source folder
    .pipe(gulp.dest(destination)) // and put into build folder
});
Before running our newly created task, let’s create some files in source folder. For start create index.html file with contents below:
<body>
<h1>Hello, cutie!</h1>
</body>
Now we can run our copy task like that:
gulp copyAfter you should see an identical copy of index.html in the build folder. Now let’s write something more useful using gulp plugin!
Installing gulp plugins
Let’s create file package.json in which we will describe our project, but most importantly list plugins that we will use — packages that our project will depend on.
Use the following command to generate package.json file:
npm init -yAs you can see by the contents of the generated file, locally installed gulp package was automatically added to the dependencies list. Let’s move it to the devDependencies list because we will need gulp only for development, not for production. You can read more about package.json on the official npm documentation page here.
Your package.json should look something like this:
{
	"name": "gulp-examples",
	"version": "1.0.0",
	"description": "",
	"main": "gulpfile.js",
	"scripts": {
		"test": "echo \"Error: no test specified\" && exit 1"
	},
	"keywords": [],
	"author": "",
	"license": "ISC",
	"devDependencies": {
		"gulp": "^3.9.1"
	}
}
Now to install gulp plugin we can use the following command:
npm install plugin-name --save-devSASS task
To compile SASS files into CSS we will use gulp-sass plugin.
We need to install it first:
npm install gulp-sass --save-devLet’s create a simple SASS file called styles.sass in the source folder:
h1
	color: aquamarine
	padding: 1em
	transform: scale(0.9, 0.9)
Now let’s add task named sass to our gulpfiles.js so it will look like this:
var gulp = require('gulp'); // Requiring locally installed gulp package
var sass = require('gulp-sass'); // (New)

//...

gulp.task('sass', function() {
	return gulp.src(source + '*.sass') // Take all files with extension 'sass'
	.pipe(sass()) // (New) Compile them to CSS using gulp-sass plugin
	.pipe(gulp.dest(destination)) // and put CSS into build folder
});
Now we can run sass task:
gulp sassLet’s reference our css file in index.html:
<link rel="stylesheet" type="text/css" href="./styles.css">
<body>
<h1>Hello, cutie!</h1>
</body>
Adding pipes to the SASS task
It’s important that compiled CSS code is supported by all popular browsers. Plugin gulp-autoprefixer will help to prefix css properties with different vendor prefixes such as -webkit-, -ms-, etc.
Also, we can improve our sass task by minimizing CSS code using gulp-clean-css plugin.
Don’t forget to always install plugins first:
npm install gulp-autoprefixer gulp-clean-css --save-devNow we can add two pipes to our sass task:
//...
var cleanCSS = require('gulp-clean-css'); // (New)
var autoprefixer = require('gulp-autoprefixer'); // (New)

//...

gulp.task('sass', function() {
	return gulp.src(source + '*.sass') // Take all files with extension 'sass'
	.pipe(sass()) // Compile them to CSS using gulp-sass plugin
	.pipe(autoprefixer({browsers: ['last 2 versions'], cascade: false})) // Autoprefix CSS to support last two versions of popular browsers
	.pipe(cleanCSS()) // (New) Minimize CSS
	.pipe(gulp.dest(destination)) // and put CSS into build folder
});
Run sass command again and you will see that styles.css file now contains minimized and prefixed CSS code.
Improving plugin loading
As you can each plugin needs to be loaded like that:
var plugin = require('gulp-plugin');Install gulp-load-plugins plugin and update gulpfile.js so it will look like that:
var gulp = require('gulp');
var plugins = require('gulp-load-plugins')(); // (New)

var source = 'source/', destination = 'build/';

gulp.task('copy', function() {
	return gulp.src(source + '*')
    .pipe(gulp.dest(destination))
});

gulp.task('sass', function() {
	return gulp.src(source + '*.sass')
	.pipe(plugins.sass()) // (Changed)
	.pipe(plugins.autoprefixer({browsers: ['last 2 versions'], cascade: false}))
	.pipe(plugins.cleanCss()) // (Changed)
	.pipe(gulp.dest(destination))
});
Further improvement of gulp file
Using package pump we can make look gulpfile.js even prettier.
Install pump package and update usage of pipes in tasks like that:
var gulp = require('gulp');
var plugins = require('gulp-load-plugins')();
var pump = require('pump');

var source = 'source/', destination = 'build/';

gulp.task('copy', function(callback) {
	pump([
		gulp.src(source + '*'),
		gulp.dest(destination)
	], callback);
});

gulp.task('sass', function(callback) {
	pump([
		gulp.src(source + '*.sass'),
		plugins.sass(),
		plugins.autoprefixer({browsers: ['last 2 versions'], cascade: false}),
		plugins.cleanCss(),
		gulp.dest(destination)
	], callback);
});
And most importantly pump will also help with handling errors occurred during the work of the plugins.
JavaScript task
Let’s use gulp-uglify plugin to minimize our JavaScript files.
Here’s the task’s code:
gulp.task('js', function(callback) {
	pump([
		gulp.src(source + '*.js'), // Take all files with extension 'js'
		plugins.uglify(), // Minimize JavaScript code
		gulp.dest(destination) // and put it into build folder.
	], callback);
});
Also, let’s add scripts.js to the source folder:
document.querySelector('h1').style.backgroundColor = 'cadetblue';<link rel="stylesheet" type="text/css" href="styles.css">
<body>
<h1>Hello, cutie!</h1>
</body>
<script src="scripts.js"></script>HTML task
Let’s replace our currently useless copy task with the html task, that will minify HTML code. For that, we’ll use gulp-htmlmin plugin.
gulp.task('html', function(callback) {
	pump([
		gulp.src(source + '*.html'),
		plugins.htmlmin({collapseWhitespace: true}),
		gulp.dest(destination)
	], callback);
});
We pass some options to the plugin, telling it to remove all useless whitespaces from the HTML code.
Build and clean tasks
Let’s add build task that will run all needed tasks to build the project and clean task that will delete contents of the build folder. For deleting folders or files we’ll use del package.
// ...
var del = require('del');

// ...

gulp.task('clean', function() {
	return del(destination + '*')
});

gulp.task('build', ['clean', 'html', 'sass', 'js']);
As you can see from the code above we’re passing an array with the names of the tasks after the build’s task name. It means that build task will depend on those — gulp will run all the tasks from the array before running the build task.
But there’s one problem in that code — all the tasks in the array will run simultaneously. And we need to run clean task first and after its completion run all the others.
To solve this problem we’ll use gulp-sync plugin:
// ...
var gulpsync = require('gulp-sync')(gulp);

// ...

gulp.task('build', gulpsync.sync(['clean', ['html', 'sass', 'js']]));// Run clean task first, and then all the others
Now we can build our project with the single command:
gulp buildConvenient development with BrowserSync and watch function
Building project and reloading browser manually each time we change our source code is not a very convenient way of front-end development process.
A plugin called browser-sync will make our lives much easier — it will inject CSS code when we change it and reload browser in case of other code changes in our project.
Also, watch function of gulp will help us run needed tasks each time we change source code.
Here’s code of a new default task:
// ...
var browserSync = require('browser-sync').create();

// ...

gulp.task('default', ['build'],  function() {
	gulp.watch(source + '*.sass', ['sass']); // Runs 'sass' task if files with 'sass' extensions change in source folder
	gulp.watch(source + '*.js', ['js']);
	gulp.watch(source + '*.html', ['html']);

	gulp.watch(destination + '!(*.css)').on('change', browserSync.reload); // reload browser when any file changes in build folder, but files with 'css' extenson. We'll inject changed css files in 'sass' task

	browserSync.init({ // Initialization of BrowserSync plugin
		server: {
			baseDir: destination // BrowserSync's server will serve content from the 'build' folder
		}
	});
});
Also, wee need to update sass task:
gulp.task('sass', function(callback) {
	pump([
		gulp.src(source + '*.sass'),
		plugins.sass(),
		plugins.autoprefixer({browsers: ['last 2 versions'], cascade: false}),
		plugins.cleanCss(),
		gulp.dest(destination),
		browserSync.stream() // (New) Inject updated CSS code to browser without reloading it
	], callback);
});
Execut the following command:
gulpUploading code using SFTP
Using gulp-sftp plugin, let’s create the upload task, which will build and then upload files to a remote server:
gulp.task('upload', ['build'], function (callback) { // Before uploading, we have to make sure, that project has been built.
	pump([
		gulp.src(destination + '/**/*'), // Upload everything from 'build' directory including folders structure.
		plugins.sftp({
			host: 'example.com', // Remote host. Could be a hostname or an ip address.
            user: 'root', // Username.
            key: { location:'~/Keys/example.com.key', passphrase: 'secret' }, // Path to SSH key and passphrase for it.
			remotePath: '/usr/share/nginx/html/' // Path on the host, to where plugin should upload project's files.
		})
	], callback);
});
That’s just the beginning
In the next article about gulp, I will write about templates, loading JSON data, minimizing images, and other awesome and more advanced applications of gulp.
Github project
You can find example project on GitHub. Have fun!