In this article, you’ll find instructions for how to setup multiple websites with SSL on one host easily using Docker, Docker Compose, nginx, and Let’s Encrypt.
Prerequisites
This article assumes that you have a little experience with Ubuntu and know what Docker is. Also, that you have installed Docker and Docker Compose on your Ubuntu system. Instructions on how to do it you can find on the official Docker’s documentation page and Docker Compose documentation page respectively.Nginx proxy
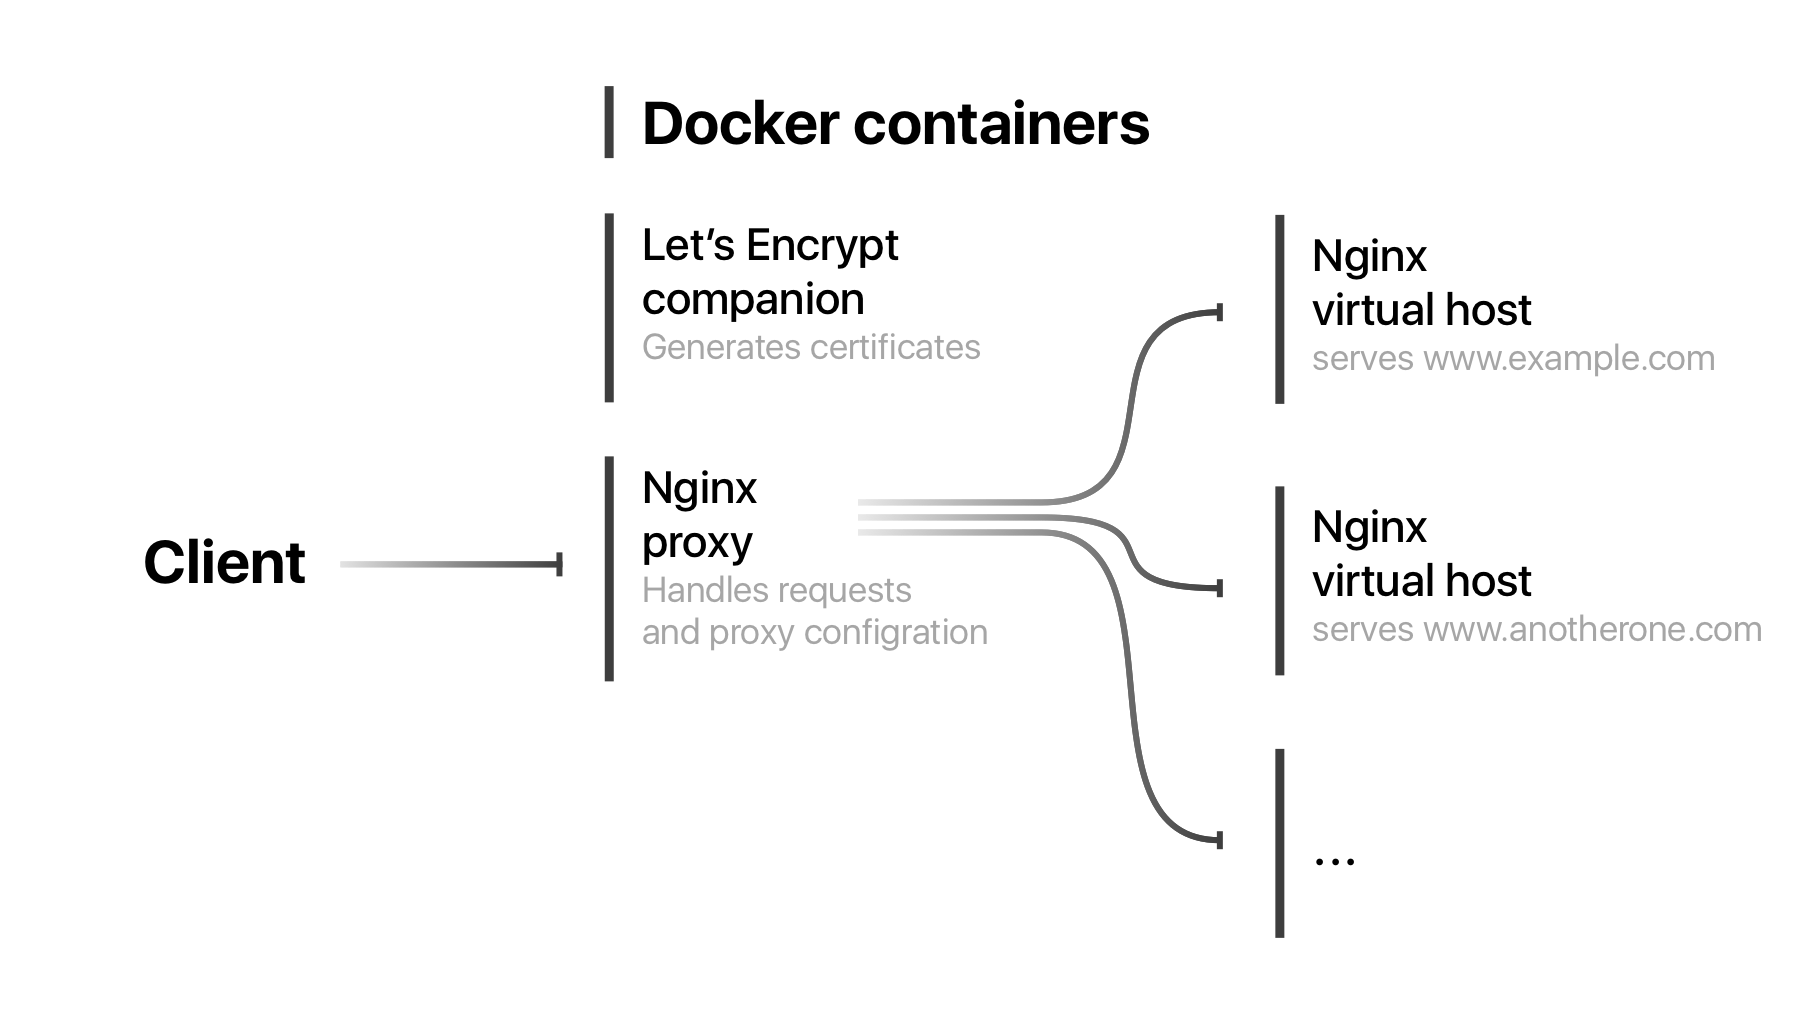
To be able to host multiple websites on one machine we need a proxy server that will handle all requests and direct them to the correct nginx server instances running in Docker containers. To achieve that we will use jwilder/nginx-proxy image for Docker. It will automatically configure a proxy for our nginx containers when we launch them.Let’s Encrypt companion
For automatic certificate management, we will use jrcs/letsencrypt-nginx-proxy-companion image. It will watch for containers that we launch and do everything needed along with the nginx proxy to enable SSL on our nginx virtual host containers.Main Docker Compose file
Let’s start by creating our main Docker Compose file, that will launch our nginx proxy and Let’s Encrypt companion containers. In a separate folder called proxy create file docker-compose.yml with contents below:
version: '3' # Version of the Docker Compose file format
services:
    nginx-proxy:
        image: jwilder/nginx-proxy:alpine
        restart: "always" # Always restart container
        ports:
         - "80:80" # Port mappings in format host:container
         - "443:443"
        networks:
         - nginx-proxy # Name of the etwork these two containers will share
        labels:
         - "com.github.jrcs.letsencrypt_nginx_proxy_companion.nginx_proxy" # Label needed for Let's Encrypt companion container
        volumes: # Volumes needed for container to configure proixes and access certificates genereated by Let's Encrypt companion container
         - /var/run/docker.sock:/tmp/docker.sock:ro
         - "nginx-conf:/etc/nginx/conf.d"
         - "nginx-vhost:/etc/nginx/vhost.d"
         - "html:/usr/share/nginx/html"
         - "certs:/etc/nginx/certs:ro"
    letsencrypt-nginx-proxy-companion:
        image: jrcs/letsencrypt-nginx-proxy-companion
        restart: always
        container_name: letsencrypt-nginx-proxy-companion
        volumes:
         - "/var/run/docker.sock:/var/run/docker.sock:ro"
         - "nginx-conf:/etc/nginx/conf.d"
         - "nginx-vhost:/etc/nginx/vhost.d"
         - "html:/usr/share/nginx/html"
         - "certs:/etc/nginx/certs:rw"
        depends_on: # Make sure we start nginx proxy container first
            - nginx-proxy
networks:
    nginx-proxy: # Name of our shared network that containers will use
volumes: # Names of volumes that out containers will share. Those will persist on docker's host machine.
    nginx-conf:
    nginx-vhost:
    html:
    certs:
Now, if we’ll execute following command:
docker-compose up -dFlag -d means that we want to run our containers in the background (detached mode).
Use the following command to check containers status:
docker psNginx virtual host
Now, we will launch our first nginx container that will securely serve content through the proxy to the client.
In a new folder, called example.com (replace with the name of your domain) create new docker-compose.yml file. In a subfolder named www place contents of your website. Also, create a subfolder called nginx with two files called Dockerfile and default.conf.
Structure of example.com folder should look like this:
- www folder with your website’s content
- index.html
- etc…
- nginx
- Dockerfile
- default.conf
- docker-compose.yml
Dockerfile:
FROM nginx:alpine
COPY ./nginx/default.conf /etc/nginx/conf.d/default.conf # Copy nginx configuration file
COPY ./www/ /usr/share/nginx/html/ # Copy website contents
default.conf:
server {
	listen 80 default_server;
	listen 443 ssl;

	server_name example.com;

	root /usr/share/nginx/html/;
	index index.html;

	location / {
		try_files $uri $uri/ =404;
	}
}
docker-compose.yml:
version: '3'
services:
    nginx:
        container_name: example-nginx
        image: example-nginx
        restart: always
        build:
            context: ./
            dockerfile: ./nginx/Dockerfile
        environment:
         - VIRTUAL_HOST=example.com # Enviroment variable needed for nginx proxy
         - LETSENCRYPT_HOST=example.com # Enviroment variables needed for Let's Encrypt companion
         - [email protected]
        expose:
         - "80" # Expose http port
         - "443" # along with https port
        networks:
         - nginx-proxy # Connect this container to network named nginx-proxy, that will be described below
networks:
    nginx-proxy:
        external:
name: proxy_nginx-proxy # Reference our network that was created by Docker Compose when we launched our two main containers earlier. Name generated automaticaly. Use `docker network ls` to list all networks and their names.Now everything ready for building and launching our container:
docker-compose up -dNow you have three up and running Docker containers: nginx proxy for handling requests and configuring proxies for our virtual hosts, Let’s Encrypt companion for generating SSL certificates and one virtual host container that will serve to users content.
That’s it!
In no time you’ll be able to access your website securely!To launch another virtual host, just repeat steps starting from Nginx Virtual Host paragraph.
Rebuilding container’s image
To rebuild docker images described in compose file, for example, if you changed website’s content, use the following command:
docker-compose buildWhat if something isn’t working
If you have problems launching containers, try to launch them without -d flag, this way you’ll be able to see the output of the container’s service (its stdout and stderr).
To see logs of already running container you can use the following command:
docker logs CONTAINER_IDTo find CONTAINER_ID look at the output of the following command:
docker psSNI
Ability to serve content from different domains using different certificates from one host is possible thanks to SNI. You can read more about this technology on Wikipedia. It’s widely supported technology in browsers and other web clients. You can check support by popular web browsers here.
Github project
You can find example project on GitHub. Have fun!